Thursday, April 28, 2016

Personalisation

How to create Personalised / Customised Views on your website 

There are many reasons why one would want to create customised views of the website, they frequently visit. Users are mostly interested in only a small section of the website and are always desperate to get the information with minimum clicks.

Why personalised views

As a user, I am interested only on notifications, alerts or disruptions that affect me. Hence, I wish to get that information in the quickest possible way. This creates a strong proposition for one to create personalised websites.

How can we do it

We can leverage the power of local storage to create personalised views for each and every user. This has many advantages compared to Single Sign-On Users.
1) Local storage lies on the client side and hence is fast compared to fetching view-specific data from the database on the server
2) Local storage can be easily cleared and the customised view can be easily reconstructed with local storage afresh.
3) Practically no infrastructure support is required
4) Development time is reduced considerably due to above reasons

Who has done it

Transport for London (TfL) has shown the way in this direction. Its award winning website attracts over 20 million visitors a month, which shows the scale of its operations. Recently, TfL has launched the Personalisation feature on its website. 


If you now launch the TfL website, you will notice a "Star" icon at the extreme right. Clicking on the "star" starts your personalisation "journey". 

What all can I personalise and how does it look

If the user has not favourited any part of the website then it will be presented with a list of options that user can 'favourite'.

First Time User Mode

This is the mode when the user has not customised any part of the website. 


In this mode, the user is presented the option to favourite any or all of the tube lines (including London Overground, TfLRail and DLR), buses, Roads, River buses, Trams and Emirates Cable car.
So, you can see that as a user, you can customise your views for all these modes of transport from the website.

Add / Edit Mode:

In this mode, users can add or edit the modes for which they wish to view disruptions. Clicking on the "Lines" link presents the option to add or edit the tube lines.


As you can see tube lines favourited would be "starred". "Starred" lines would be added to your customised view and any disruptions on those lines would be visible to you across the website. 

Status mode:

In this mode, all the favourited lines are visible alongwith their "status" information. If there is any disruption on your favourited lines then those will be visible in this mode.


Base on the above, you will appreciate that this personalised feature reduces the real-estate of the website by providing users only the information they are interested in. Moreover, showing all the customised views as an overlay across the website enhances the visual appeal of the website. As the website is fully responsive, it caters to most of the mobile devices by providing a comparable user experience (UX) as a native app !

Can I get customised view on home page

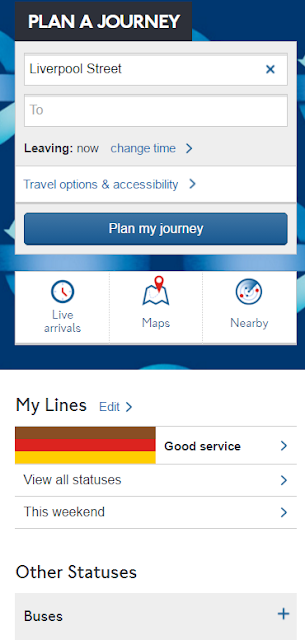
TfL has smartly thought out the possible places where customised views would increase user-acceptability of personalisation feature. As a result they have elevated customised views on the Home Page (Landing page) as well.


This completes the personalisation journey for 1 mode of transport and as you can see how it enhances the user engagement by providing features that 'you' are interested in.

All the modes of transport can be added to your views in a similar way except for buses. So, next time we will take a look at the buses.

Note: This blog post is not endorsed by TfL in any way and am just one of the developers on this project. It is my endeavour to share my learnings from my work and highlighting the concepts through websites or data available in public domain.

So, play with it, like it, drop in your comments.

Saturday, May 16, 2015

API Documents page using Swagger

Creating APIs to be consumed by 3rd party applications (public API) have become very important especially with the explosive growth witnessed by mobile apps. Exposing RESTful end points for consumption by mobile apps (or any application) involves lot of testing to generate stable APIs.
When the endpoints are to be consumed by other public applications then a strong and simplified documentation with sample usage becomes all the more important. Following up with the consumers regarding the usage is the last thing one would want to do after the development of RESTful services.

As you services evolve during the development phase, keeping up with the documentation poses a real challenge. It becomes increasingly difficult to be sure whether the document is a true reflection of the APIs, meaning whether the document is 'live'.

To make the document generation process less painful and ensuring that it is always 'live', several tools have been developed. One such tool, which I found useful is 'Swagger'. This tool allows your API to be documented in real-time and that too without writing a single line of code. Now, how cool is that !

Pre-requisites: I am assuming that you already have an ASP.NET WebApi project created and that you are able to access some of the RESTful endpoints. For Swagger to work, your controller must be derived from ApiController base class.
My WebApi would be a self hosted one so the following steps are valid for self hosted services.

1) Please install the swashbuckle nuget package in your web api project either using the Package Manager console or 'Manage Nuget Packages' control menu.
PM> install-package swashbuckle
Then, install swashbuckle.core package in similar way.
PM> install-package swashbuckle.core

After installing the above packages, a new .cs file names "SwaggerConfig" would be created in the App_Start folder. This file contains the code to activate your WebApi.

That's it. Now run your WebApi project and browse the following URL,
"http://localhost:<your port no.>/swagger/"


The highlighted text is the name of the controllers in my Web Api. If you Expand Operations then you also have the facility to invoke the API and check the result.

Now, you will never have to maintain the documents for your public APIs. It is all embedded in your code.


Tuesday, July 9, 2013

Unit testing philosophies - TDD and BDD

I am sure nobody denies the benefits of unit testing. Until 2-3 years ago everybody agreed that unit testing is definitely beneficial for the project, but very few had mechanisms (or tools) in place to do the same.
With Visual studio 2010 and MS Test Unit testing framework in place, it has now become very easy to write and maintain unit test cases within the same solution as your project.
MS Test unit tests can be executed singularly or in a group and the results of the test are available in the Test results window. The test result is actually a file with .trx extension located in 'TestResults' folder inside your project folder. One can easily export the .trx file into an html file by means of a command line utility freely available from codeplex at this location, http://trxtohtml.codeplex.com/
The html file can then be sent over an email, which can be viewed in a browser.

TDD:
Test Driven Development, is a unit testing mechanism wherein a class' methods are tested. Testing philosophy is Fail, code, re-factor. It is important to note that this philosophy reduces the dead or unnecessary code from the project, which means less code and hence less maintenance.
However, TDD approach is more understandable by the developers and is mainly testing the methods of a class. For a non technical PM it is difficult to get all the information from TDD test results. Hence, there remains a disconnect between a PM and the development team.

BDD:
Behavior Driven Development aims at abstracting the testing, one level up from just class methods testing (in TDD) to testing the scenarios. These scenarios can be same as Use cases which everyone is familiar with since UML was introduced. Hence this form of testing is easily understood by BA and PM from the end-user perspective.
One of the popular BDD frameworks for .NET is NSpec which is freely available via the Nuget manager.
Lets go through a sample to understand it better.

I am interested in testing the Account class, which is as below,

class Account
    {
        public double balance { get; set; }

        public int  AccountType { get; set; }


        public Account()
        {          
        }

        public bool CanWithdraw(double withdrawAmount)
        {
            bool bReturn = false;

            if (balance > withdrawAmount)
                bReturn = true;

            return bReturn;
        }
    }

And the BDD tests can be written as follows,
class describe_contexts : nspec
    {
        private Account account;
        void describe_Account()
        {
            context["when withdrawing cash"] = () =>
                {
                    before = () => account = new Account();
                    context["account is in credit"] = () =>
                        {
                            before = () => account.balance = 500;
                            it["the account dispenses cash"] = () => account.CanWithdraw(60).should_be_true();
                        };
                    context["account is overdrawn"] = () =>
                        {
                            before = () => account.balance = -500;
                            it["the account does not dispense cash"] = () => account.CanWithdraw(60).should_be_false();
                        };

                };
        }
    }

And to run this test, type the following command in the Package Manager Console,
PM> nspecrunner <Project name>\bin\debug\<Project name>.dll

You will be surprised to see how easy it is understand the output of this test.

describe contexts
  describe Account
    when withdrawing cash
      account is in credit
        the account dispenses cash
      account is overdrawn
        the account does not dispense cash

Thats it. It is very much readable and understandable by anyone. Which means that these tests can then form the basis for your requirements document which can then be shared with all the project stakeholders.
So now we have the power of integrating the project documents in your solution that can be maintained on the fly.

Hope you'd appreciate this article and going forward, would adopt more and more of BDD in your projects.


Wednesday, April 10, 2013

Well Designed and Maintainable Code - Points to consider


Well designed and maintainable code-base helps in reducing the cost of development (including Change Requests and code enhancements).
(A) What makes a code-base well designed and maintained?
Every software application is developed with an intention of solving a problem. The problem is specified by means of requirements (SRS). It is in the interest of all the stakeholders that the requirements are elicited to the maximum extent possible.
As explained above, if a software is developed against a set of requirements (or use cases if UML is used) then it must be possible to test each and every requirement implemented by the software, distinctly. Testability ------ (1)
Since a software implements a pre-defined set of requirements, technically, it is possible to write the entire application in one single file !!! But then is that a good approach?  (If I were to develop a library).
Hence, it is always, better to divide the entire application into smaller parts (layers/modules). So Separation of Concerns (layers) is another key---- (2)
Each module in the software should cater only to a specific functionality. Single responsibility Principle--- (3)
All the modules in the software must be loosely coupled and highly cohesive inorder to create a maintainable application. The impact of a change in one module must be minimal on other modules---------- (4)
Often developers  are faced with same kind of problems and scenarios across a multitude of applications. In such scenarios, it is often better to go for tried-and-tested solutions. i.e. Design Patterns -------- (5)
Apart from the above, sufficient documentation by means of code comments and project artefacts, adherence to consistent naming convention, principles of OOP (viz. polymorphism,  encapsulation, Inheritance must be used whereever necessary) ---- (6)

But, if somebody is taking a technical interview then simple answers are not understood by the interviewers. So explain them as follows,
A well designed and maintainable software exhibits following principles,
1) Single Responsibility Principle -  Every class must serve one responsibility
2) Open/Close Principle - A module must be open for extension but closed for modification
3) Liskov Substitution - instances of derived classes should be able to replace all the base class references without breaking the code
4) Interface Segregation - prefer client specific interfaces over one generic interface.
5) Dependency Inversion - All the modules should be based on abstractions and not concrete classes. Use dependency injection instead of creating instances of temporary 'Helper' classes.
To summarise, a maintainable software must be SOLID in design. 

(B) What underlying principles or qualities do you look for in a system of classes that tells you they are well designed and maintainable?
A software consists of modules/components that act in cohesion to produce the necessary functionality. Now, every module is implemented by means of a set of classes (in OOP languages, structural languages like 'C' do not support 'class').
Classes must be written so that it adheres to the principles of OOP. For instance, having all the data members of the class as 'public' is possible but it is a bad practice and strongly discouraged. Data Hiding  -------- (1)
Classes can be inherited from other classes to maximise the code re-use and create a hierachy of similar classes. 'Is-A' relationship, inheritance ------ (2)
If the developer has a reason for not allowing a class to be inherited then he can do so by decorating his class using 'sealed' attribute ( in C#) Usage of appropriate attributes ----(3)
As far as possible, creating 'new' objects of a class within another class must be avoided. Instead inject the dependency by means of constructor/.NET property.------- (4)
No Hardcoding of any sort in the classes ---------------- (5)
Limiting one class to one .cs file is a good practice ------ (6)
Apart from the above, code comments, naming convention and testability (unit testing) of classes still holds true and that cannot be relaxed.

Monday, February 18, 2013

Implementing POST requests in .NET

Data transfer between the client and server takes place over the sockets and in byte format. Which means that anything a client needs to send to a server must be converted into bytes either implicitly or explicitly.
POST requests differ from other HTTP requests (apart from PUT) in the concept that in POST request, the client sends data in the 'body' of the HTTP packet. Hence we should understand how to send this data on the client side and at the same time how do we extract the body from the HTTP packet on the server side for further processing. Most of the sites only speak about the GET requests which are far simpler to consume by any client. It is the POST/PUT requests which needs to be understood very well.

As mentioned earlier, the data needs to be sent as a stream of bytes hence if you need to transfer an object of a class then it must be serialized into a stream of bytes by serialization. This post relates with JSON (de)serialization.

Lets take a look at some client and server side code in .NET.

Client Side:


string endPoint = "http://localhost:20909/surveyupload"; // endpoint address to send the data on
var request = (HttpWebRequest)WebRequest.Create(endPoint);
request.Method = "POST";          

string PostData = Newtonsoft.Json.JsonConvert.SerializeObject(survey); // JSON serialization

if (!string.IsNullOrEmpty(PostData))
{                  
         byte[] byteContent = Encoding.UTF8.GetBytes(PostData);                

         using (var writeStream = request.GetRequestStream())
         {
                writeStream.Write(byteContent, 0, byteContent.Length);
          }
  }


using (var response = (HttpWebResponse)request.GetResponse())
{
      var responseValue = string.Empty;

      if (response.StatusCode != HttpStatusCode.OK)
      {
              var message = String.Format("Request failed. Received HTTP {0}", response.StatusCode);
                        throw new ApplicationException(message);
       }

       // grab the response
       using (var responseStream = response.GetResponseStream())
       {
             if (responseStream != null)
             using (var reader = new StreamReader(responseStream))
             {
                   responseValue = reader.ReadToEnd();
               }
         }
}


Server side:
The following method is your sample function implemented on the server side, that maps to the endpoint request made from client.


public string GetFile(System.IO.Stream data)
        {
            string JSONInString = string.Empty;
            using (StreamReader reader = new StreamReader(data))
            {
                JSONInString = reader.ReadToEnd();
                reader.Close();            
            }
            // Deserialize the streamed byte data into the object of known type as below
            SurveyData ReceivedData = JsonConvert.DeserializeObject<SurveyData>(JSONInString);
            if (ReceivedData != null)
                return "Success";
            else
                return "Failed";
        }

That's it. It is very easy to implement the POST requests in .NET. The above client requests can be further elaborated depending upon the requirement. This may involve adding additional headers, modifying content-types, user-agent, etc. properties of the Http request.

For details regarding the importance of REST services, please refer to, http://intelligentfactory.blogspot.co.uk/2012/09/rest-services-primer-all-about-rest.html

Wednesday, October 31, 2012

Geolocation sample in HTML5

Geolocation is an interesting feature deployed by numerous mobile applications. It allows an application to find the location of mobile/device. And based on the location the application can provide various services or advertisements.

Geolocation in HTML5?
HTML5 allows one to use to geolocation services quite easily and within few minutes one should be able to see something working.

lets see an example of how to use the geo location in HTML5.

One needs to use the geolocation object exposed by the navigator in-order to  utilize its services. The geolocation object has 2 methods which provide the location information.
1) getCurrentPosition : to be used when the location information is required just once.
2) watchPosition : to be used when one needs to monitor or track the location periodically.

Both the methods have identical signatures. The arguments for each of the functions is as below,
a) Arg1 (Mandatory) : call back function, which will be called when the function call suceeds
b) Arg2 (Optional) : call back function, which will be called when the function call fails
c) Arg3 (Optional) : PositionOptions object

The following code will show a button and on clicking the button the virtual globe should be visible. In Firefox one would see the info bar and a message box prompting the user to accept the location information.

Paste the following code in the <body> of an html file.
<p>
<button onclick="GetMap()">Show map</button>
</p>
<div id="mapDiv" style="position: relative; width: 800px; height: 600px;"></div>
<script type="text/javascript" src="http://ecn.dev.virtualearth.net/mapcontrol/mapcontrol.ashx?v=7.0"></script>
<script>

            var map = null;
            function GetMap() {
                /* Replace YOUR_BING_MAPS_KEY with your own credentials.
                    Obtain a key by signing up for a developer account at
                    http://www.microsoft.com/maps/developers/ */
                var cred = "<Your BING KEY>";
                // Initialize map
                map = new Microsoft.Maps.Map(document.getElementById("mapDiv"),
                    { credentials: cred });
                // Check if browser supports geolocation
                if (navigator.geolocation) {
                    navigator.geolocation.getCurrentPosition(locateSuccess, locateFail);
                }
                else {
                    alert('I\'m sorry, but Geolocation is not supported in your current browser.');
                }
            }


           // Successful geolocation
            function locateSuccess(loc) {
               // Set the user's location
               var userLocation = new Microsoft.Maps.Location(loc.coords.latitude, loc.coords.longitude);
             
               // do your operations
            }

            // Unsuccessful geolocation
            function locateFail(geoPositionError) {
                switch (geoPositionError.code) {
                    case 0: // UNKNOWN_ERROR
                        alert('An unknown error occurred, sorry');
                        break;
                    case 1: // PERMISSION_DENIED
                        alert('Permission to use Geolocation was denied');
                        break;
                    case 2: // POSITION_UNAVAILABLE
                        alert('Couldn\'t find you...');
                        break;
                    case 3: // TIMEOUT
                        alert('The Geolocation request took too long and timed out');
                        break;
                    default:
                }
            }

</script>

That's it. Plain and simple to get location information in HTML5.

Sunday, September 9, 2012

REST Services : A Primer. All About Rest Services

Today we will understand how to consume the WCF REST services on the client side.
The theory of REST can be understood from numerous resources online. This post will explain how to make the different types of requests.

Why REST?
Anyone who has worked with web-services and WCF is often confused as to why one should create RESTful services when SOAP has been easy and good to use for so long. So the short answer for using REST is less data traffic on the network. Every data packet to be sent over SOAP is packaged in a bulky header.

The main verbs in a REST implementation are GET, PUT, POST. There are other verbs as well but they are infrequently used. One can try these requests by using a popular tool like WebFetch (we will discuss using the WebFetch tool in a later post)

Lets go to some practical examples:
In many applications viz the secured ones, every client is issued a certificate so that every REST request from the client is authenticated and then authorised to perform the operation (specified by the verb)

How to use the client certificates in REST:
HttpClient client = new HttpClient( <Url on which request is to be made> );

string certLoc = <certificate location>;
string certPwd = <certificate pwd>;

X509Certificate2 cert = new X509Certificate2(certLoc, certPwd);
client.TransportSettings.ClientCertificates.Add(cert);


1) The complete sample for GET request would look as below,

using (HttpClient client = new HttpClient( <Url on which request is to be made> ))
            {
                // Initalise a response object
                HttpResponseMessage response = null;

                string certLoc = <certificate location>;
                string certPwd = <certificate pwd>;

                X509Certificate2 cert = new X509Certificate2(certLoc, certPwd);
                client.TransportSettings.ClientCertificates.Add(cert);

                string sRestAddress =  <Url on which request is to be made>;
                client.BaseAddress = new Uri(sRestAddress);

                // encoding to be used. base64_UTF16_Encode is a user-defined function
                string sBase64EncodedMembershipNumber = base64_UTF16_Encode(sMembershipNumber);

                string authrorization = "Basic" + sBase64EncodedMembershipNumber + "\r\n";
                client.DefaultHeaders.Authorization = new Microsoft.Http.Headers.Credential(authrorization);             
                client.DefaultHeaders.Accept.Add("text/xml\r\n");             

                string requestPath = <request path of the resource>;

                // Make the request and retrieve the response
                response = client.Get(sRestAddress + requestPath);
                response.Content.LoadIntoBuffer();              
                return response.Content.ReadAsByteArray();
            }


The above code snippet shows how we can make a GET request and pass the client certificate and logging credentials along with the request. Response could either be in xml or pdf format and can be specified in the header by using the Accept type in the HTTP request.

2) The PUT request would look like below,

using (HttpClient client = new HttpClient( <Url on which request is to be made> ))
            {
                // Initalise a response object
                HttpResponseMessage response = null;

                string certLoc = <certificate location>;
                string certPwd = <certificate pwd>;

                X509Certificate2 cert = new X509Certificate2(certLoc, certPwd);
                client.TransportSettings.ClientCertificates.Add(cert);

                string sRestAddress =  <Url on which request is to be made>;
                client.BaseAddress = new Uri(sRestAddress);

                // encoding to be used. base64_UTF16_Encode is a user-defined function
                string sBase64EncodedMembershipNumber = base64_UTF16_Encode(sMembershipNumber);

                string authrorization = "Basic" + sBase64EncodedMembershipNumber + "\r\n";
                client.DefaultHeaders.Authorization = new Microsoft.Http.Headers.Credential(authrorization);           
                client.DefaultHeaders.Accept.Add("text/xml\r\n");             

                string requestPath = <request path of the resource>;
             
                // XML file which contains the data to be sent
                XDocument doc = XDocument.Load(@"C:\Personal\Test.xml");

                HttpContent body = HttpContent.Create(doc.ToString(SaveOptions.DisableFormatting), Encoding.UTF8, "text/xml");

                response = client.Put(sRestAddress + requestPath, body);
                response.Content.LoadIntoBuffer();              
                return response.Content.ReadAsByteArray();
            }

The above code snippet shows how to send a PUT request to the server. PUT/POST requests are used to send data to the server. The exact type of verb to be used is decided by the author of the Server code and the requirement whether the state of server is to be changed or not.

REST is fairly easy and simple to use.